Unknown's avatar

About AnnaGoAnna

Aunt~BubblesLover~Volunteer~Sarcoma~Phyllodes~Friend~BerkeleySqBenchOwner~Foodie~Glassmaker~Crafter

Sarcoma Support

Sarcoma UK‘s Annual report arrived in this post this morning with a little note “.. you may recognise a certain person inside :-)…”

Well there I am!   Taken at the Sarcoma UK’s Big Conversation Day last year.Sarcoma UKMy quote “Being diagnosed with a sarcoma can be isolating due to the rarity of this type of cancer. …” remains absolutely true for many today.

Sarcoma is rare.  Divide ‘Sarcoma’ into types – soft tissue and bone.  Then divide further into the different sub-types.  Each sub-type is different with it’s own surgical regimen and treatment plan.

Now try and find others who understand what you’ve been diagnosed with!

(This doesn’t just apply to cancer or sarcoma.  There are some very special/rare/unique diseases of other kinds that also must fear the unknown and isolation when diagnosed).

Fortunately with people having more access to the internet and feeling more confident to use it for support, this has meant a far further reach for support.  Certainly I’m not sure how I would have coped had it not been for our wonderful Facebook Phyllodes Support Group members.  For all the criticism about social media and all that is wrong with it, there is an enormous amount that’s right.

For those fortunate enough to be able to travel or live near a physical support group – Sarcoma UK run a number of support groups up and down the country as well as online forums.  More information can be found here

Images on Glass Course – Final Week

Firstly an update on the pieces that were fired during the week.

Screenprint after firingAs you can see the screenprinted images using black ink have worked well.  Sadly the blue ink is fairly pale on most and the orange ink has in most places burnt away.  Personally I love the unpredictability of some areas in glass and it’s why there’s a need to test everything as you go along and continually learn.

My small Teddy Wolfe images have been stuck together and will be fire again into a stack (see below).  Which, with a little bit of hard work and a grinder to neaten up the edges will, hopefully, mean that I have a sort of 3D image of the picture.

Our tutor also had back sheets of decals using images that we’d emailed to her.  I wanted to use some black and white images of my parents.

IMG_8970

As this was our final class in the course, today our tutor encouraged us to re-explore the different methods we’d learned in the short course.

I concentrated mainly on using the decals we’d had printed and screenprinting.  I was keen to revisit the idea of screenprinting one image and then laying them over each other to create a multi-dimensional image.

So that the images would be as close as I could get, to being in same spot on each piece of glass, I first set up my screenprinting area.  Under the screen I taped a piece of cardboard from which I’d cut the size of the glass pieces.  Masking tape was stuck around the image I was using on the screen.  The screen was then stuck to the table at one end and then each corner marked out once again with masking tape.  The rest was up to me and my dodgy eyesight!

IMG_8969First the area is ‘flooded’ with ink by carefully dragging the ink over the area.  Then the glass is placed under the screen (in the cardboard slot) and ink is pulled over.  As my images have incredibly thin lines I dragged the ink over it several times, hoping that it would be a clean thicker line without being smudged.

This time, instead of firing the pieces and then stacking them, I chose to leave the images to air-dry and stack them for a single firing.

Stacking GrannyEeek it was mightily difficult to get it lined up perfectly!

Some of my peers in this final class concentrated on using powders on glass.  Others drew with enamel and then used powders and frit.  Some used their decals and screenprinted.  Here’s a selection of what’s being fired this week (including a batt of my stacks).

IMG_8973 IMG_8972Fabulously diverse and once again will be interesting to see what comes out from the firing.

Finally we lay out a selection of our pieces that we’d finished so far on this short course.  (Obviously there are some in for firing during this week and attendees will need to pop back to the college to collect them).

IMG_8971I think you’ll agree there are some wonderful pieces demonstrating different methods.  Certainly something I’m keen to understand further and do more of but most of all I can honestly say we’ve had a huge amount of enjoyment on the course.  Thank you Richmond Adult Community College our tutor, Monette and not forgetting the technician, Sally, who ensures our pieces are fired for us.

Be in the Audience – TV/Radio

A short while ago I decided it was high time I looked again at things to do in London for free or in the affordable range. It is possible!  We’re all very used to going to do what we always do, or hanging out in places that we’re used to.  It’s often only when we’ve got friends visiting us that we try somewhere new or become a tourist in our town City.  Why is this?

When I returned from Australia in 2003 I looked at London through new eyes, itme on my hands before I got a job and short of cash!  I realised that although I’d lived in London for over 12 years before I moved to Australia I’d not really ‘visited’ London for a very long time.  So before I got a job and to keep myself occupied during the days, I spent a great deal of time finding something to do every day (after applying for jobs in the morning) that would mean I spent no more than £5 a day (including travel).

OK so 13 years later I’d have to maximise £5 slightly but there’s still a heap you can do in London for next to nothing or free.  So over the coming months I’m intending to rediscover a few of them, discover some new ones and share them with you.  What have you done?  Where do you go? What’s affordable to you?

London doesn’t have to be a wildly expensive place… unless you make it that way!

So my first stop was looking at ‘being in an audience’.  I found the online links and applied to a number of shows.  I suspected that I’d maybe get one show I applied for but didn’t expect to get every single one.  So here are a few:

The Last Leg – #IsItOK
Love watching this show so it was a treat to see it being filmed.  Laughed a lot.  Loved the warmup game of ‘human tinder’ too!

TV Audience3Katherine Ryan – Pilot for a new show The Katherine Ryan’s Famous Celebrity Show.
Not hugely funny.  I think Katherine is a better stand up comic than a host so will be interesting to see if this show goes to air.TV Audience2David Mitchell – Radio 4 show ‘The Unbelievable Truth’
Really enjoyed seeing this radio show recorded.  Very funny.  TV Audience1Graham Norton Show – The Eastender Special.
Great fun to watch and be a part of.  Graham Norton definitely has a great rapport with all his guests and is able to keep the ‘show going’ between takes and with slightly more difficult guests.  Very interesting to see it filmed and then watch it back on TV to see how it’s cut.

TV AudienceYou do however have to remember that these tickets are free.  You are required (of course) to stay for the whole filming.  For the majority of the recordings you need to turn up several hours beforehand, stand in line and get a wrist band.  Usually you can then disappear for a coffee/something to eat etc and rejoin the queue shortly before being asked to file in and take your seat.  This process can take a while so be prepared to stand around for a while.

I also registered for seats at Britain’s Got Talent auditions.  I’d hoped to take my friend’s teenager during their school holidays.  Fortunately (as it turned out) they were busy on that date so a friend and I went along.  We arrived very early and anticipated a long queue.  However it turned out that people had queued over night and despite our turning up early all tickets had been allocated and we were turned away.  I can’t imagine how that would have been had I travelled up to London with teenager and then had to disappoint them with nothing.  BUT they do warn you they oversubscribe the ticket allocation so that the audience is full for filming!

Another downside is where they maybe filming two episodes on the same day but switching guests and audience between filmings.  We registered to see a new Greg Davies show being filmed in Clapham.  We were due to see the second filming of the day.  After standing in a queue for nearly 2 hours we heard that the first filming was just about to finish.  By our calculations this would mean that we’d not be seated until after 9.30pm, the filming was a couple of hours, there would inevitably be additional warm up, phaffing, retakes etc and doubted if we’d be out in time to get the last train home.  So despite being fourth from the front of the queue, chose to leave and get a late supper and head home.

So it doesn’t always go to plan.  You must however commit to attending the audience for the whole evening/allocated time, clap/laugh/boo/hiss when told and generally be fabulous TV/radio fodder for the listener/viewer.

It’s fun.  It’s great fun to see what really goes on to produce the show you’re watching/listening to.  I’d thoroughly recommend it… but allow plenty of time and remember they’re free tickets but in return for being free you’ve got to stand in line and then you’ve got a job to do!

Here’s a couple of links that you may find useful:
BBC London – http://www.bbc.co.uk/showsandtours/tickets/
ITV have a list of companies they use for their tickets – http://www.itv.com/beontv/join-the-audience
Channel 4- http://www.channel4.com/programmes/take-part/articles/all/get-tickets

And if you’re brave enough… be on TV!
http://www.channel4.com/programmes/take-part
http://www.itv.com/beontv
http://www.bbc.co.uk/showsandtours/beonashow/

Images on Glass course – screenprinting

Today’s excitement was to learn how to screen print a photo onto glass.  Below are two images drawn by Edward Wolfe that I chose to use.  Our tutor resized our emailed photos and printed onto transparent plastic sheets ready for our class today.

Images on Glass sp1First we prepared our canvas with photo emulsion.  This was applied in a thin layer by pulling the photo emulsion upward using a trough to evenly spread the emulsion over the screen.  This is then immediately placed on a dark shelf (with no light) to dry.  This will absorb the image once exposed to light.

Images on Glass sp2Once dry, we readied the light box by warming up the bright light and positioning our sheets of images.  Quickly we transferred the now dry screen and placed this over the images, covering quickly with blackout material.  Finally we put old heavy telephone directories on top to keep it in place whilst the image is exposed.  3mins and 20seconds later we switched off the light box.

The final step was to remove the screen from the light box (with fingers crossed) and to take it to the sink.  As we watched the screen be showered with water, the images started to emerge.  Witchcraft!

[I was doing the ‘washing’ so didn’t get any pictures of our screen at the final stages]

Images on Glass SP4Finally with the images now on the screen, it was time to create some enamel paste and to screen print them onto glass.

Images on GlassSP6Different results with different colours used.  Below are a selection of the glass with images from the group awaiting firing in the kiln.  (You will see that I reused the red striker glass that hadn’t shown the orange powder before – let’s see how it works).  (Also one of my classmates reused a powdered image with screen printed text on top.)

We’ll all have to wait until next week to see the results.

Images on Glass SP7Finally, our tutor also showed us a slightly different method to utilise multiple colours via screen printing.  You apply the enamel colours in splotches over the image.  Then a line of the acrylic medium and pull the squeegee dragging the medium first and picking up the enamel but forcing both through the mesh.  Again an interesting image created and I’m intrigued to see how that will look once fired.

Images on Glass SP11

Images on Glass course – Glass Powder

My second week on this course our tutor showed us to apply images to glass using powder.  Using different mesh levels we saw how to use objects to create an image.  Sticking paper to the mesh, drawing with wax crayons and freehand sprinkling of powder.  Al these methods give different results.  Thickness of the glass powder.  Layering colour and depth.  Refined sharp edges and gently smooth, smokey sprinkling.

Below are images of our tutor demonstrating a couple of techniques and the middle picture is the fired glass with the images burned into the glass.

Images on Glass11Below are a few of the classes attempts prior to firing.  You can see we’ve used different methods and differing levels of artist expertise too!

Images on Glass12Post firing below.  I was pleased with the orange powder over black bullseye glass – I hadn’t been sure if it’d disappear into the black.  However the same orange powder did disappear into the red striker glass to leave just a solid fired red tile!

Images on Glass13My attempt at creating an image by drawing with wax crayon onto the mesh (red bottom left picture).  Then the powder was gently applied (orange and yellow – top left picture).  The other two images show the fired finished glass.

Images on Glass14

Images on Glass course – Decals

I started a new glass making course at Richmond Adult Community College – “Images on Glass”.  No surprise but I’m already loving the course and it’s only week 1.  Three more Saturdays of exploring and experimentation with different methods of applying images to glass.

First and foremost a quick introduction for ‘newbies’ to types of glass to use (Bullseye or Float), compatibility and how to cut glass.

This week we rummaged through an old box of decals and found our images to practice with.  I selected poppies as I loved the vivid red but was unsure whether it would remain so vivid once fired.  (I did say there was experimentation, right?).

We painted on other glass with enamels (mixing with acrylic media (water based and gloss)).

Another method was by using leaves and grass.  We made prints from them by rolling ink over the leaf/grass and then rolling this over the glass to leave the image on the glass.

One further experiment was to see if we were able to create our own ‘transfers’ using enamels, contact paper and leaves.  We printed a leaf onto paper.  Then covered this with sticky paper.  With the back of a spoon we rubbed the image right into the sticky paper.  Next we ran it under water and rubbed the paper away, leaving the image on the (now not) sticky paper.  Once dry, the stickiness returns.  This was then stuck onto glass, like a homemade transfer/decal.

A selection of images prior to being fired in the kiln.

Images on Glass decal 1Below are photos of our glass images after firing.  As a group we used different decals, painting techniques, colours and depth.  Sadly (and oddly) the experimental own transfer/decals didn’t work – the images had disappeared.  I’m going to try it again before the end of the course as this SHOULD work so we’re not sure what happened.  Watch this space.

Images on Glass decal 2I was also intrigued to see what would happen to some of my images if I stacked them and refired them.  I stacked (with 2 layers) some handpainted glass tiles.  I stacked (with 3 layers) butterfly decals.  And totally as an experiment I didn’t think would work was 7 layers of poppies!

Below top left is the firing tray loaded with stacks and the remaining pictures are post firing.  The one that worked best was the poppies.  Next job is to grind and polish the edges and then I’ll show you the 3D element to the stack.

Images on Glass decal 3

Crocheting

Whilst in Washington I attempted to do a few rows of Andi’s crochet project.  Actually I found it really rather addictive and so rewarding when it looks great.  Sadly I clearly needed a little more practice as I dropped a few stitches on Andi’s piece – but hey she’ll know the bit I ‘helped’ with!

So I decided that I’d try to crochet a small blanket for Andi.  Either as a throw over for a bed or to snuggle up with on the sofa.   First things first was to find some wool and crochet needle.  I found a wonderful little shop nearby StitchUp and naively went in to source supplies.  I left with a bag of wool and a new crochet hook… a little nervous as I can’t remember how to do it.

IMG_8542

YouTube.  I found a fabulous channel Bella Coco and managed to get to grips with creating granny squares in about 15 minutes!

IMG_8545

Another YouTube Video to find out how to do the outer edge.

IMG_8694And finally another video to learn how to join them together.

IMG_8693And the finished present for my lovely friend Andi.

IMG_8699Can’t explain just how proud I felt when I wrapped up a parcel for Washington with my handmade blanket.  Between the folds I snuck in a few extra little gifts for both Andi and Sam.  Homemade card, decoupaged heart, British chocolate and sweets, crazy mini tic-tac boxes that I thought Sam would love and finally a bracelet each for Andi & Sam from the wonderful company Rebel Rocks.

10422531_10152792599246814_8336563909036861021_nLoved the message I received from Andi and Sam when the package arrived in Washington.  “Received a wonderful package from @annagoanna1 !!!! Kept digging hoping to find Anna in there! What a great day!”

There’s something so very special about making gifts for people.  Made with love and care.

Health Update

Yesterday I had a follow-up appointment with the dermatology hospital specialist to see how the nuclear levels of drugs were working on my auto-immune disease, Lichen Planus.

I was a little sheepish when I went into the consulting room because I didn’t complete the whole drug regimen prescribed.  I know.  Do as I say, not as I do.  I began by explaining why I stopped.  At first he looked at me as if to ask if I didn’t believe he was the expert in the room, but then he smiled and told me he’d have done the same if experiencing the same side affects!

So what side affects was I experiencing (and that I haven’t told you about!), some of the worst were visual migraines which would come on quickly and mean that I couldn’t see properly, certainly couldn’t see any written word or computer and even when it came on when I was playing tennis, I’d mistake flashes of white migraine for the ball (most amusing to watch not to experience)!  I also had horrible pulsing pain in temples.  A lot of stomach cramps.  Nails crumbled if I touched anything.  Vomiting in the night.  Weird dream/nightmares that were totally vivid and technicolour.  Odd ‘away with the fairies’ feeling where I’m in the room but everyone around me is underwater.  And those are just a few of them as well as not a great head space and a lot of tears.

He was, given the above, pretty impressed that I’d managed to keep going with them for as long as I had.  We then moved on to examining the lesions.

Really pleased with the nuclear drug regimen.  For the most part I’m now left with ‘burn-out’ scarring on my wrists, torso, belly, thighs, armpits and feet.  Some of these areas have faded already but he told me that the scars sometimes don’t go for many many years and in some cases, never.  I’m not sure any of you will be seeing me in a swimsuit for a long time!  (**collective sigh of relief**)

The disease is still active in me though.  I have a new lesion on the palm of my hand and more on my feet again.  He’s recommended that I continue with the steroid creams on my hand and feet and monitor the situation.

The other area of concern was in my throat.  He examined my mouth and said he couldn’t see any lesions so the drugs had worked there too.  However the ‘piece of bread’ that I can feel stuck in my throat may not indeed be a lesion at all.  He believes it’s too far down my throat to be LP as it usually doesn’t go farther than the back of the mouth.  He thought that this may be damage from the drugs or a tear in my throat that perhaps has been exacerbated by the vomiting whilst taking the drugs.  He said he wasn’t too concerned but that I should keep an eye on it.  It may well heal itself in time and now that I’m not taking the drugs nor having the side affects it may heal faster.  My call.  If I’m worried about it and it continues to remain then he said I should go back to the GP and ask to be referred to an Ear, Nose & Throat specialist.  I’m happy to wait and am sure he’s right.  It’ll heal in time.

So where now?

He was super pleased with the progress.  He was very impressed with my NHS GPs who’d prescribed early the nuclear level of drugs and said that he’d never seen an improvement of this level given the severity and extent that the Lichen Planus has spread.  He said usually he’d expect to be seeing me for many more months/years before seeing this sort of improvement.

I know from the Lichen Planus Support Group that I’ve joined on Facebook, and which has been a huge support in understanding this disease, that my recovery is incredible.  There are people in the group who literally have been fighting this for 10+ years with no remission.  Others for whom recurrences are regular.  So maybe my own immune system isn’t as knackered as it would appear.  Maybe I’ve been able to clear some of it up without the drugs.  I’ve been juicing lots of good immunity fruit and veg and even found an company (Botanic Labs) where I purchased 3 days of immunity shots.  I don’t know if this all made a difference but I certainly felt better for them all.  I just wish I’d be able to afford to continue with 3 days of shots every couple of weeks.

I know I’m not out of the woods yet.  I am however much better than I was.  I have a bathroom full of nuclear drugs.  I have access to a supportive specialist and a wonderful GP practice.

We did however decide that I should be discharged from the hospital.  If I have another attack, I must start the drug regimen again.  I have the drugs already.  He’s also given me an open appointment at the hospital so that if I have another attack or I feel I need to see him, I can.

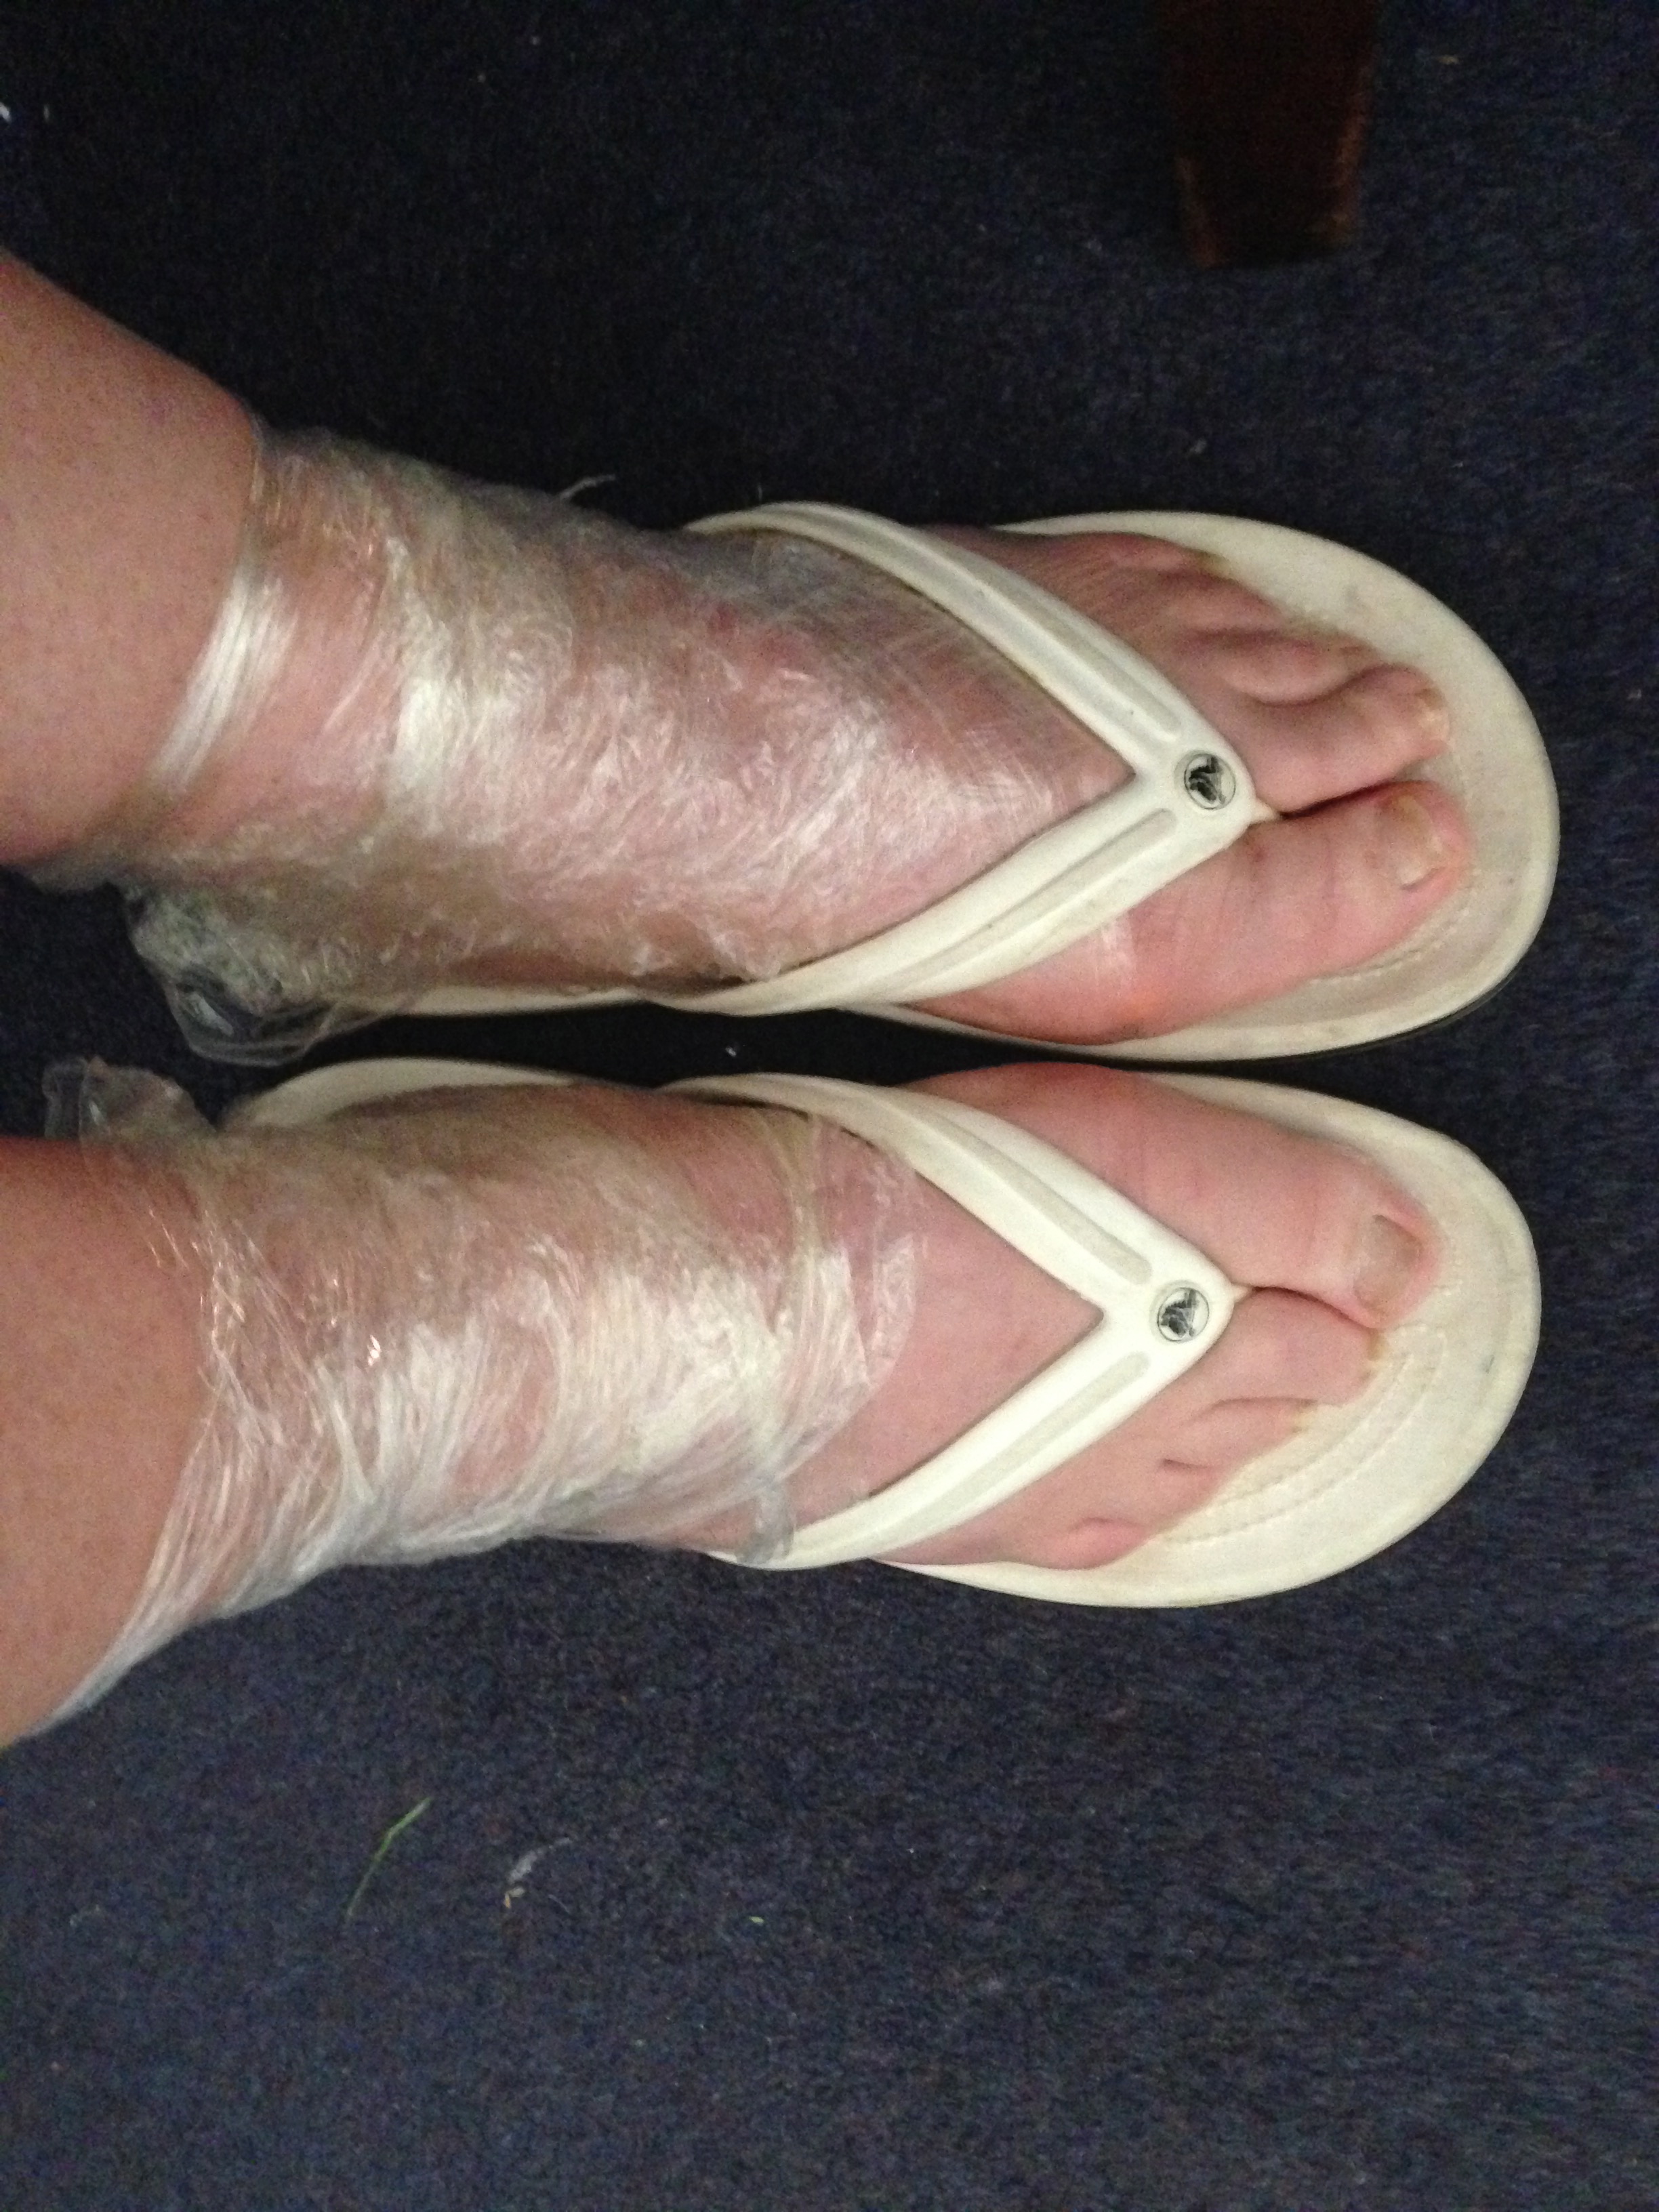
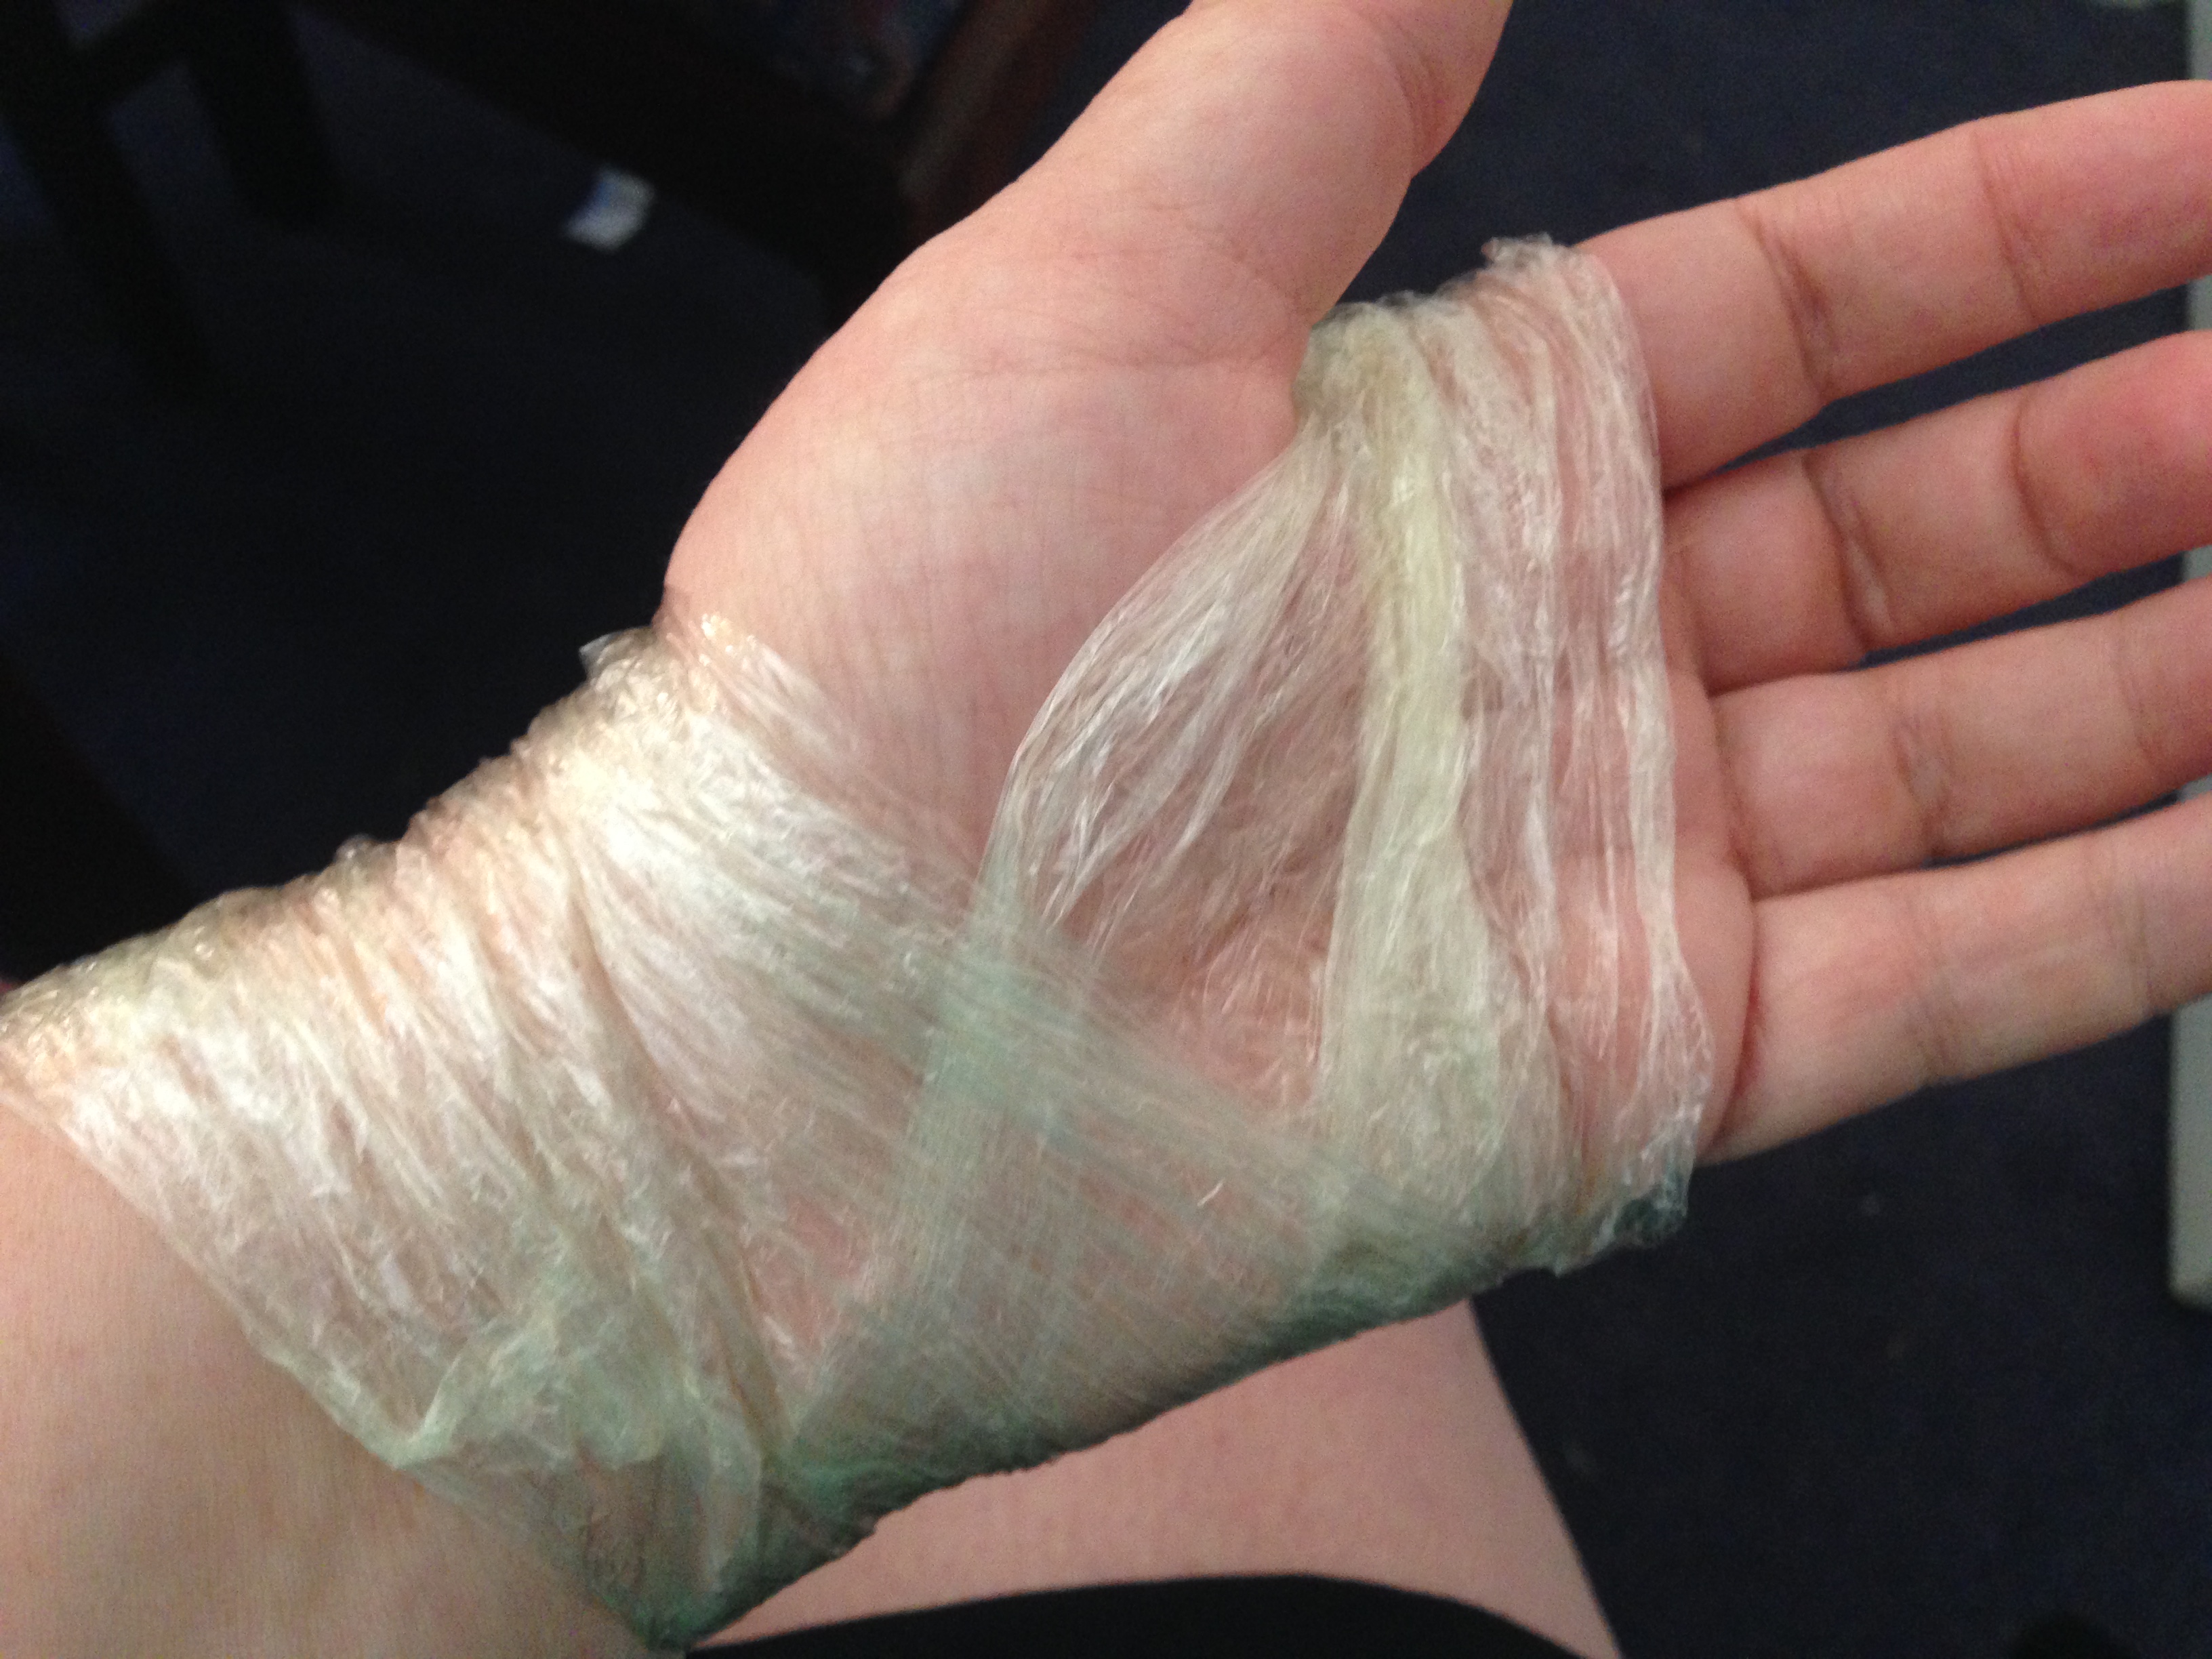
So for now, I’ll be applying steroid cream to my hand and feet.. the best way I know to make it work at super strength is to wrap in clingfilm and allow to fully soak in.  So this is me today.
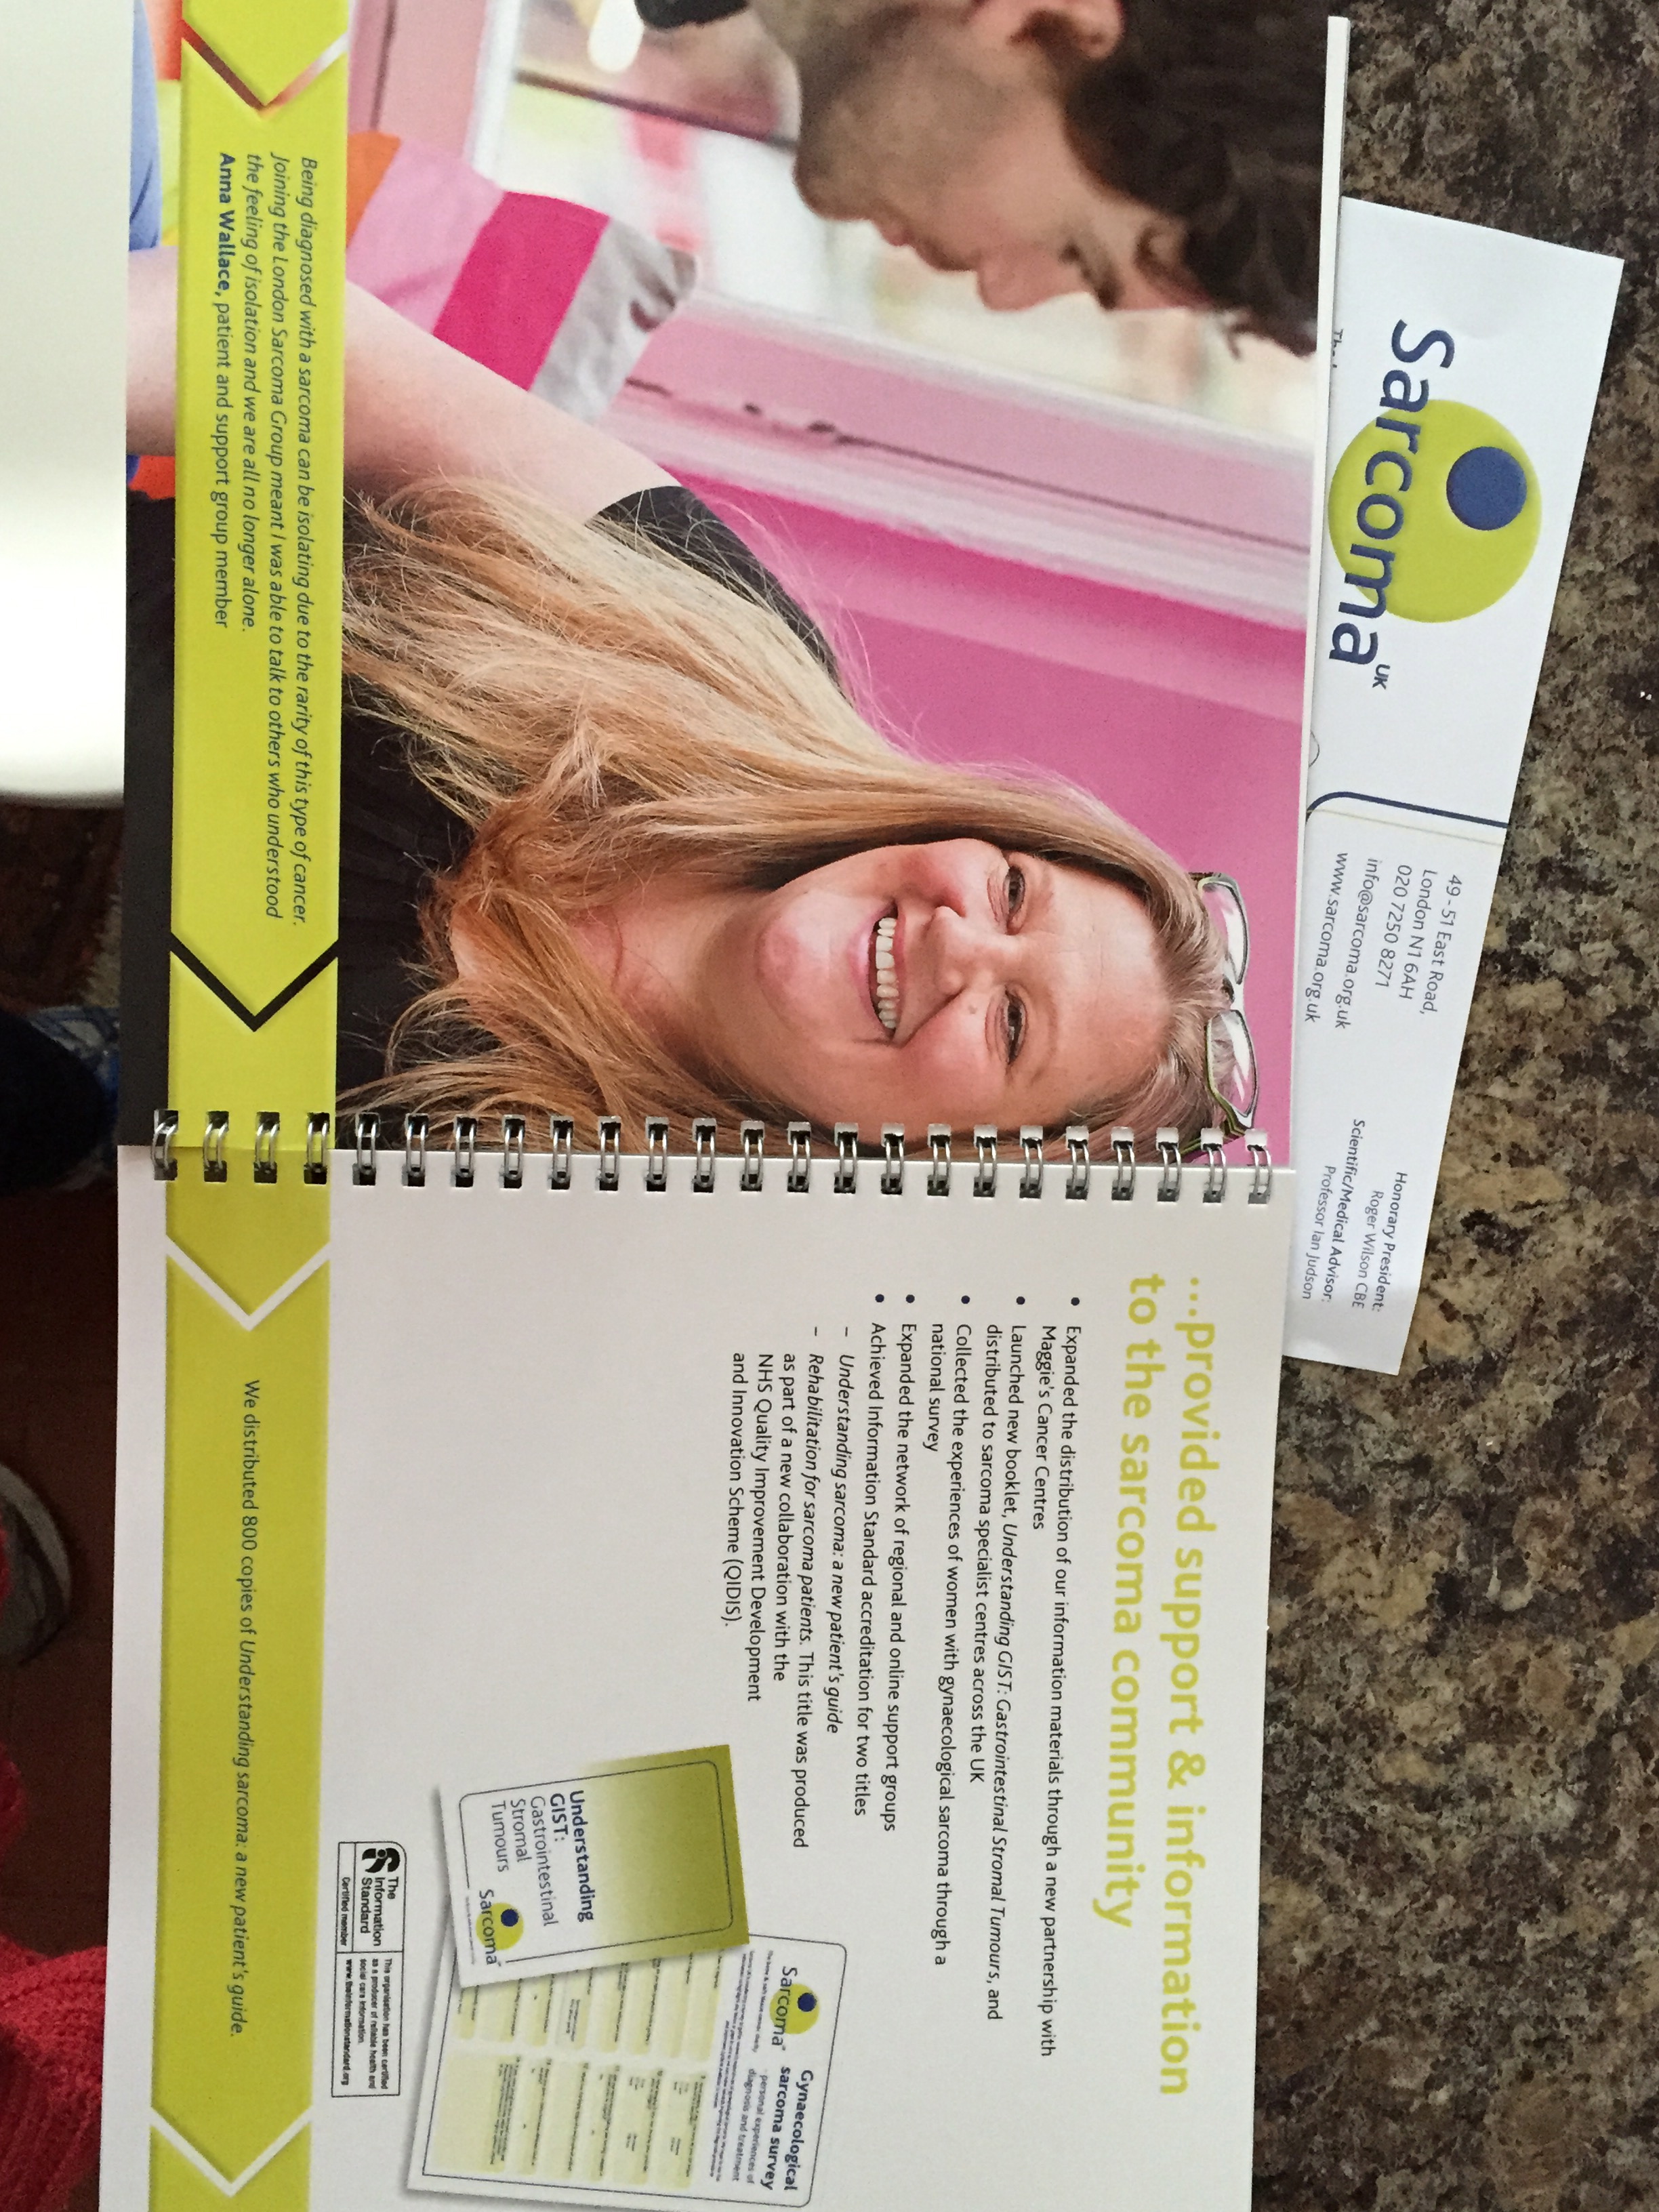
IMG_8700 IMG_8701

Glass update…

Before Easter I nervously left a big plaster mold with pieces of glass and drips of enamel on a shelf waiting to be fired in the kiln.

Today I retrieved the fired plaster block and carefully put it, upside down, into a bucket of cold water to soak.   Gradually and very gingerly I picked at the plaster removing it bit by bit.

IMG_8659

Yes I did manage to cut my hand the process!

But this was what was revealed.

IMG_8667Next steps will be sawing off the ‘reservoir’ base and then a great deal of handwork to remove the little sharp edges around the sides and polishing up the finished product.

I’m super pleased with it so far but also extremely nervous to handle it so as not to knock any of the ‘coral’ shards from the piece.  It’s fair to say though that it’ll be something to be admired rather than touched… particularly by people with small hands!

I love it and think it represents what I wanted it to do, ie coral moving in the ocean.

Wish me luck with the delicate clean up!

Golfing… again

After dusting down the golf sticks, cleaning up the golf shoes and finding my glove, I’m back.

Well when I say ‘back’, I mean I’m attempting again to learn golf.  A friend’s girlfriend has decided to learn at the course across the road from me and I’ve joined her for beginner lessons.

So we’ve finished the series of 4 beginner lessons and are now on our way to an ‘improver’ course which starts in a few weeks.  I was actually surprised how much I remembered and am still able to hit the ball – and for it to be roughly where I was aiming for it to go!  I’m loving it.

Another local friend has also joined the golfing revolution and is taking the beginners course now with the hope of finishing that course and joining us on the improver course.  Hehehe soon there will the three novice golfers out on the course!  Watch out world.